3. Usage
3.1. Controls
This section describes the control buttons located at the bottom of the main application window
- Help
Display this help
- Revert
Restores original configuration file from when grubconf was started.
- Close
Exits grubconf saving any changes that were made. This also saves a backup of the previous configuration file to /boot/grub/menu.lst~, or config_file~ if specified with -f option at the command line described above. The backup can be used to restore a previous copy of the configuration file if newly saved changes caused problems.
3.2. General
This contains options that control the GRUB interface. Figure 1. shows a sample configuration.
- Timeout
The timeout value is the amount of time before grub will boot your default OS. This value can be any non-negative integer from 0 to 99.
- Splash Image
This option is availble when splashimage is enabled at configure/compile time. The splash image is the image seen behind the grub boot screen. Checking this will allow you to select the image by specifying the Device and Location. NOTE: This option is not yet officially part of GRUB and may not work on your installation of GRUB. This is however supported on most distributions' GRUB package.
- Device
This specifies which device contains the splash image
- Filename
This is the filename (eg. /grub/splash.xpm.gz) of the splash image on the device chosen in the Device pulldown menu.
The filename path may be a bit confusing. This is because the path is relative to the device chosen, and not the path as it would be found on the system. If you use the [ ... ] button to chose a file grubconf will resolve the path based on the device chosen.
If you would like to find more information on how to create your own splashimage or are interested in the history of the splashimage patch visit the Grub Splash Image How-to, written by Luis R. Rodriguez.
- Color
This option is availble when splashimage is not enabled at configure/compile time. It allows you to specify GRUB boot menu colors.
An option for highlight is *inverse* which will cause GRUB to display the inverse of the normal color when as the highlight. Selecting either foreground or background as *inverse* will cause the other to be selected as *inverse*.- Hidden Menu
Checking the Hidden Menu checkbox will hide your grub boot screen from vew when the system boots. This is useful when only one operating system choice is available.
- Extra
This button opens a new widnow with a text box and is for advanced configuration options. Any options that are not suppored in the GUI can be configured here.
3.3. Operating Systems
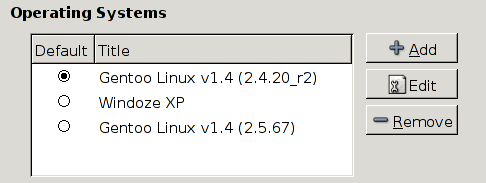
This displays the list of currently selected operating systems. Adding, Removing and Editing of the list are done in this tab. The selection of the Default OS is also done under this tab. Figure 2. shows an example configuration.
- Adding
This adds a new OS, bringing up a OS configuration dialog which allows you to configure the OS
General Options
- Title
This title names the OS and is displayed in the GRUB boot menu. It is helpful to say the OS version and Kernel version if applicable
- Type
Specifies the type of OS. This can only be changed when adding an OS, and not when editing an OS.
Linux - A GNU/Linux system
Windows - A Windows system
Other - A user specified system
- Editing
Editing an operating system is done by choosing the appropriate OS from the list and clicking the Edit button. The same window seen when adding an operating system is displayed with the current information for the selected OS. See above ADDING for details on the sections of this window. NOTE: At this time changing the OS type is not allowed when editing.
- Removing
Removing an operating system from the list is done by selecting the desired OS from the list and clicking the Remove button.
3.3.1. Operating System Types
Linux
- Kernel Device
Specifies the device which contains the Linux Kernel. This is usually your /boot partition.
- Kernel Name
This is the name of the kernel you wish to load (eg. /vmlinuz-2.4.18-14). A [ ... ] button is provided to help you select a file.
- System Root
Specifies the device associated with the system root, labeled as /.
- Kernel Parameters
Any extra parameters that you wish to add to the kernel line (eg. hdc=ide-scsi).
- Extra Options
Any extra lines desired (eg. initrd /initrd-2.4.18-14.img).
Windows
- Location
Specifies the device on which a bootable Windows partition is located (eg. /dev/hda1).
This is the command used to load a Windows OS
	rootnoverify (Location)
	makeactive
	chainloader +1
- Other
This allows you to create a user-specified operating system. This can be used for OSes that are not supported or ones that require additional parameters than those provided by the built in OS types.


